


In modern data systems, change data capture (CDC) is a method for finding, tracking, and responding to changes in a database. CDC can be very useful when building systems that rely on events, as it ensures that different parts of the system communicate effectively and that data is current and accurate.
CDC is also great for quickly moving data to other locations, like data warehouses, for analysis. It ensures that the stored data remains current despite changes in the original data set. CDC meticulously tracks every modification, making it valuable for record-keeping and compliance purposes. CDC has also proven invaluable for SaaS applications that need to power analytics from their event data.
By the end of this article, you'll understand how to set up CDC with DynamoDB. You'll leverage DynamoDB's fast performance and scalability for data processing. You'll also learn how to use CDC with other AWS services to process and analyze data in real time.
Different Approaches to Implementing CDC with DynamoDB
You can use various methods to set up CDC with DynamoDB. However, the two most popular options are Kinesis Data Streams for DynamoDB and DynamoDB Streams:
- Kinesis Data Streams for DynamoDB: This is a good pick if you need to store data for a long time (for example, up to a year) and if your app has many users. It's especially useful for apps that deal with lots of data and need to process tens to hundreds of gigabytes per second. Kinesis Data Streams replicates your changes into Amazon Data Firehose, and you can then send your data in near-real time to a data warehouse like Amazon Redshift or Snowflake. The stream records are asynchronous, and they might appear more than once in a different sequence. This might lead to duplicate data, which you'll need to consider when processing data to ensure data integrity and consistency. For more information about using Kinesis Data Streams for DynamoDB, you can check the documentation.
- DynamoDB Streams: This is the best option if you need to quickly see changes in your data and avoid duplicates. It keeps track of the changes in the right order, which is great when you need to work fast and accurately. DynamoDB Streams stores activity data for your table records for up to twenty-four hours. Each stream record is presented only once. Additionally, if you're utilizing AWS Lambda, you're entitled to up to 2.5 million monthly free reads. You can find more information on DynamoDB Streams in the documentation.
Each method has its own strengths and drawbacks and suits different needs. Your choice will depend on various factors, like how long you need to keep data, how quickly you need to process it, whether you need real-time updates, and the specific requirements of your app.
While these are the primary options that are built into Amazon DynamoDB, you can also explore additional methods:
- Third-party integration tools: Various tools from external providers, such as Fivetran or Airbyte, can enhance DynamoDB for CDC, offering capabilities such as data transformation, integration with other databases or data lakes, and improved monitoring and alerting.
- Comparing snapshots: Alternatively, if streams aren't suitable, you can periodically capture "snapshots" of your DynamoDB data and compare them to detect changes. Although not as immediate as streams, this method is suitable for data that changes less frequently or when resource management is a concern.
How to Implement CDC with DynamoDB
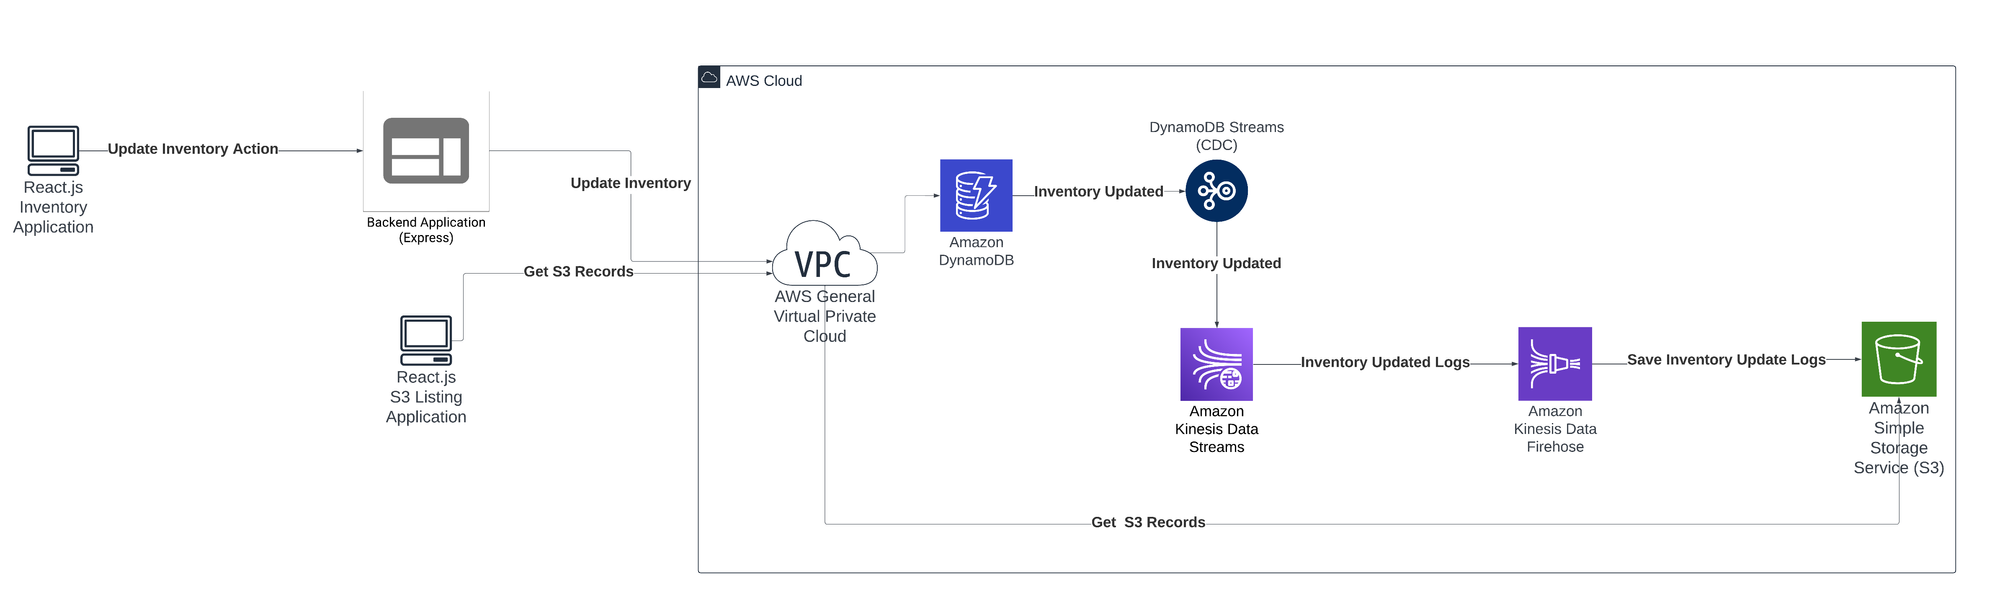
To learn how to implement CDC with DynamoDB, consider the following use case: imagine you're managing a supermarket and want to set up a system to monitor your inventory. You opt for an innovative setup that uses CDC with DynamoDB, Kinesis, and an S3 bucket.
Each time a product is purchased or restocked, and when new inventory arrives, these modifications are recorded in your DynamoDB table. Amazon Kinesis Data Streams handles the flow of your data updates. Whenever there is a change in your table, Amazon Kinesis Data Streams sends the change to your S3 bucket. This lays the groundwork for some advanced analysis—for example, using machine learning to determine customers' preferences, predict shopping trends, or optimize your stock. While this article won't cover machine learning and detailed data analysis, having your data in S3 is useful if you want to implement complex data predictions and analysis later on.
Prerequisites
Before getting started, you'll need the following:
- An Amazon Web Services account
- An IDE of your choice (this tutorial uses Visual Studio Code)
- Node.js installed on your machine
- The Git CLI installed on your machine
Creating Your DynamoDB Database
Log in to your AWS console and search for DynamoDB:
.png)
Go to DynamoDB, then click Create table:
.png)
Name your table <span class="code-exp">products</span> and put <span class="code-exp">id</span> as the partition key; this key will define the primary key of the <span class="code-exp">products</span> table. Keep all other settings as they are, then scroll to the bottom of the page and click Create table.
.png)
Once your <span class="code-exp">products</span> table is created, you should be directed to the Tables view, where you'll find the <span class="code-exp">products</span> table listed:
.png)
For testing purposes, you'll manually put a few items in the <span class="code-exp">products</span> database. To do so, click Actions and then Create item:
.png)
Next, click JSON view and turn off the View DynamoDB JSON option:
.png)
Add a JSON object like the following:
Next, click Create item:
.png)
Repeat the same procedure to create a few other items. Add any information you like, and make sure that the <span class="code-exp">id</span> string is unique for each product.
.png)
Implementing Amazon Kinesis Data Streams
Now that your database is ready, you need to enable Amazon Kinesis Data Streams. Go back to your <span class="code-exp">products</span> table details and navigate to the Exports and streams tab. Click Turn on next to Amazon Kinesis data stream details:
.png)
Click the Create new button to create a new Kinesis data stream to configure DynamoDB with Kinesis:
.png)
On the new page that opens, name your data stream <span class="code-exp">products</span>. Keep the rest of the default configuration, and scroll down to click Create data stream.
.png)
Now that your Kinesis stream is ready go back to the previous page (related to turning on the Kinesis data stream for your table) and select the Kinesis data stream that you just created from the list.
Click the Turn on stream button, which will run the stream for the <span class="code-exp">products</span> table:
.png)
Configuring Kinesis with Amazon S3
Now that you've enabled the Kinesis stream in your <span class="code-exp">products</span> table, you need to configure the delivery streams in order to send the data received by the Kinesis stream to Amazon S3.
In the AWS console, search for Kinesis:
.png)
Open Kinesis to find the main dashboard, which should have the one data stream you created but nothing under Data Firehose. Data Firehose is a fully managed service from AWS that allows you to deliver streams to destinations such as Amazon S3.
.png)
To send the data to Amazon S3, you need to create a Data Firehose delivery stream. Click Create delivery stream and set the source to Amazon Kinesis Data Streams and the destination to Amazon S3:
.png)
Under the source settings, you need to select your Kinesis stream. Click Browse, select productskinesis, and click Choose:
.png)
Next, under the destination settings, you need to select an S3 bucket or create a new one. Click Create to be redirected to creating an S3 bucket. Name your bucket <span class="code-exp">products-kinesis-bucket</span> and keep all the other settings as default. Scroll to the bottom of the page and click Create bucket:
.png)
Go back to the Destination settings section. Click Browse, choose products-kinesis-bucket, and click Choose. If you don't see your bucket listed, click the refresh icon to ensure you have the latest list:
.png)
Lastly, scroll to the bottom of the page and click Create delivery stream:
.png)
Running Your Application
To interact with the <span class="code-exp">products</span> table in DynamoDB, you'll use a basic application built using Express and React.js.
Open your terminal or shell and run the following command to clone the application:
Inside the root directory of the project, under thefolder, open the README.md and follow the instructions to run the Express application. This is a simple backend application that has two APIs: one that fetches the list of products from the DynamoDB table, and another that updates the stock for a specific product.
Once you have the backend running, navigate to the <span class="code-exp">client</span> folder, then open the README.md and follow the instructions to install and run the frontend application.
With the application successfully running, you should see the product list in your browser:
.png)
Testing DynamoDB CDC with Kinesis and S3
Now that you have everything set up, start by doing some tests to make sure everything is working as expected. For testing purposes, using the local frontend application, update the stock of bananas from 100 to 120 by putting a new value in the input field. Or, select a product of your choice and update its stock.
Once you change the value, you'll see it reflected on the product:
.png)
Next, go to your buckets in Amazon S3 and open <span class="code-exp">products-kinesis-bucket</span>. After waiting for a few minutes, you should see that a new record was created under the <span class="code-exp">2024</span> folder, which represents the current year at the time of writing. Click the <span class="code-exp">2024</span> folder in your bucket, then click the nested folders that represent the month and day. You should find a document created under the last nested folder:
.png)
Download the document and open it. You should see a JSON object that looks like the following:
You can see that <span class="code-exp">NewImage</span> has the updated information with the <span class="code-exp">Stock</span> value (<span class="code-exp">"N"</span>) of <span class="code-exp">120</span>. You also have the <span class="code-exp">OldImage</span> with the information related to the banana product before the update, which was <span class="code-exp">100</span>.
Reading S3 Bucket Files
In the previous section, you checked the files on your S3 bucket manually from the AWS console. In this part, you'll learn how to list these different files on your application.
To view these files, you'll need to use cross-origin resource sharing (CORS) on your S3 bucket. You'll need to allow your local application to access the S3 bucket. For demo purposes, you'll add the rule to allow all IP addresses. To do so, go to your S3 bucket panel, navigate to the Permissions tab, and scroll down to the CORS section. Click Edit and add the following configuration:
Save the changes by clicking the Save changes button. This configuration will allow IP addresses of all origins to connect to your S3 bucket. Note that this configuration is only suitable for demo purposes; in real production applications, you should only allow specific IP addresses related to your server.
Navigate to the <span class="code-exp">client-s3</span> folder, then open the README.md and follow the instructions to run the application. Once you have the application running, you should see the list of files:
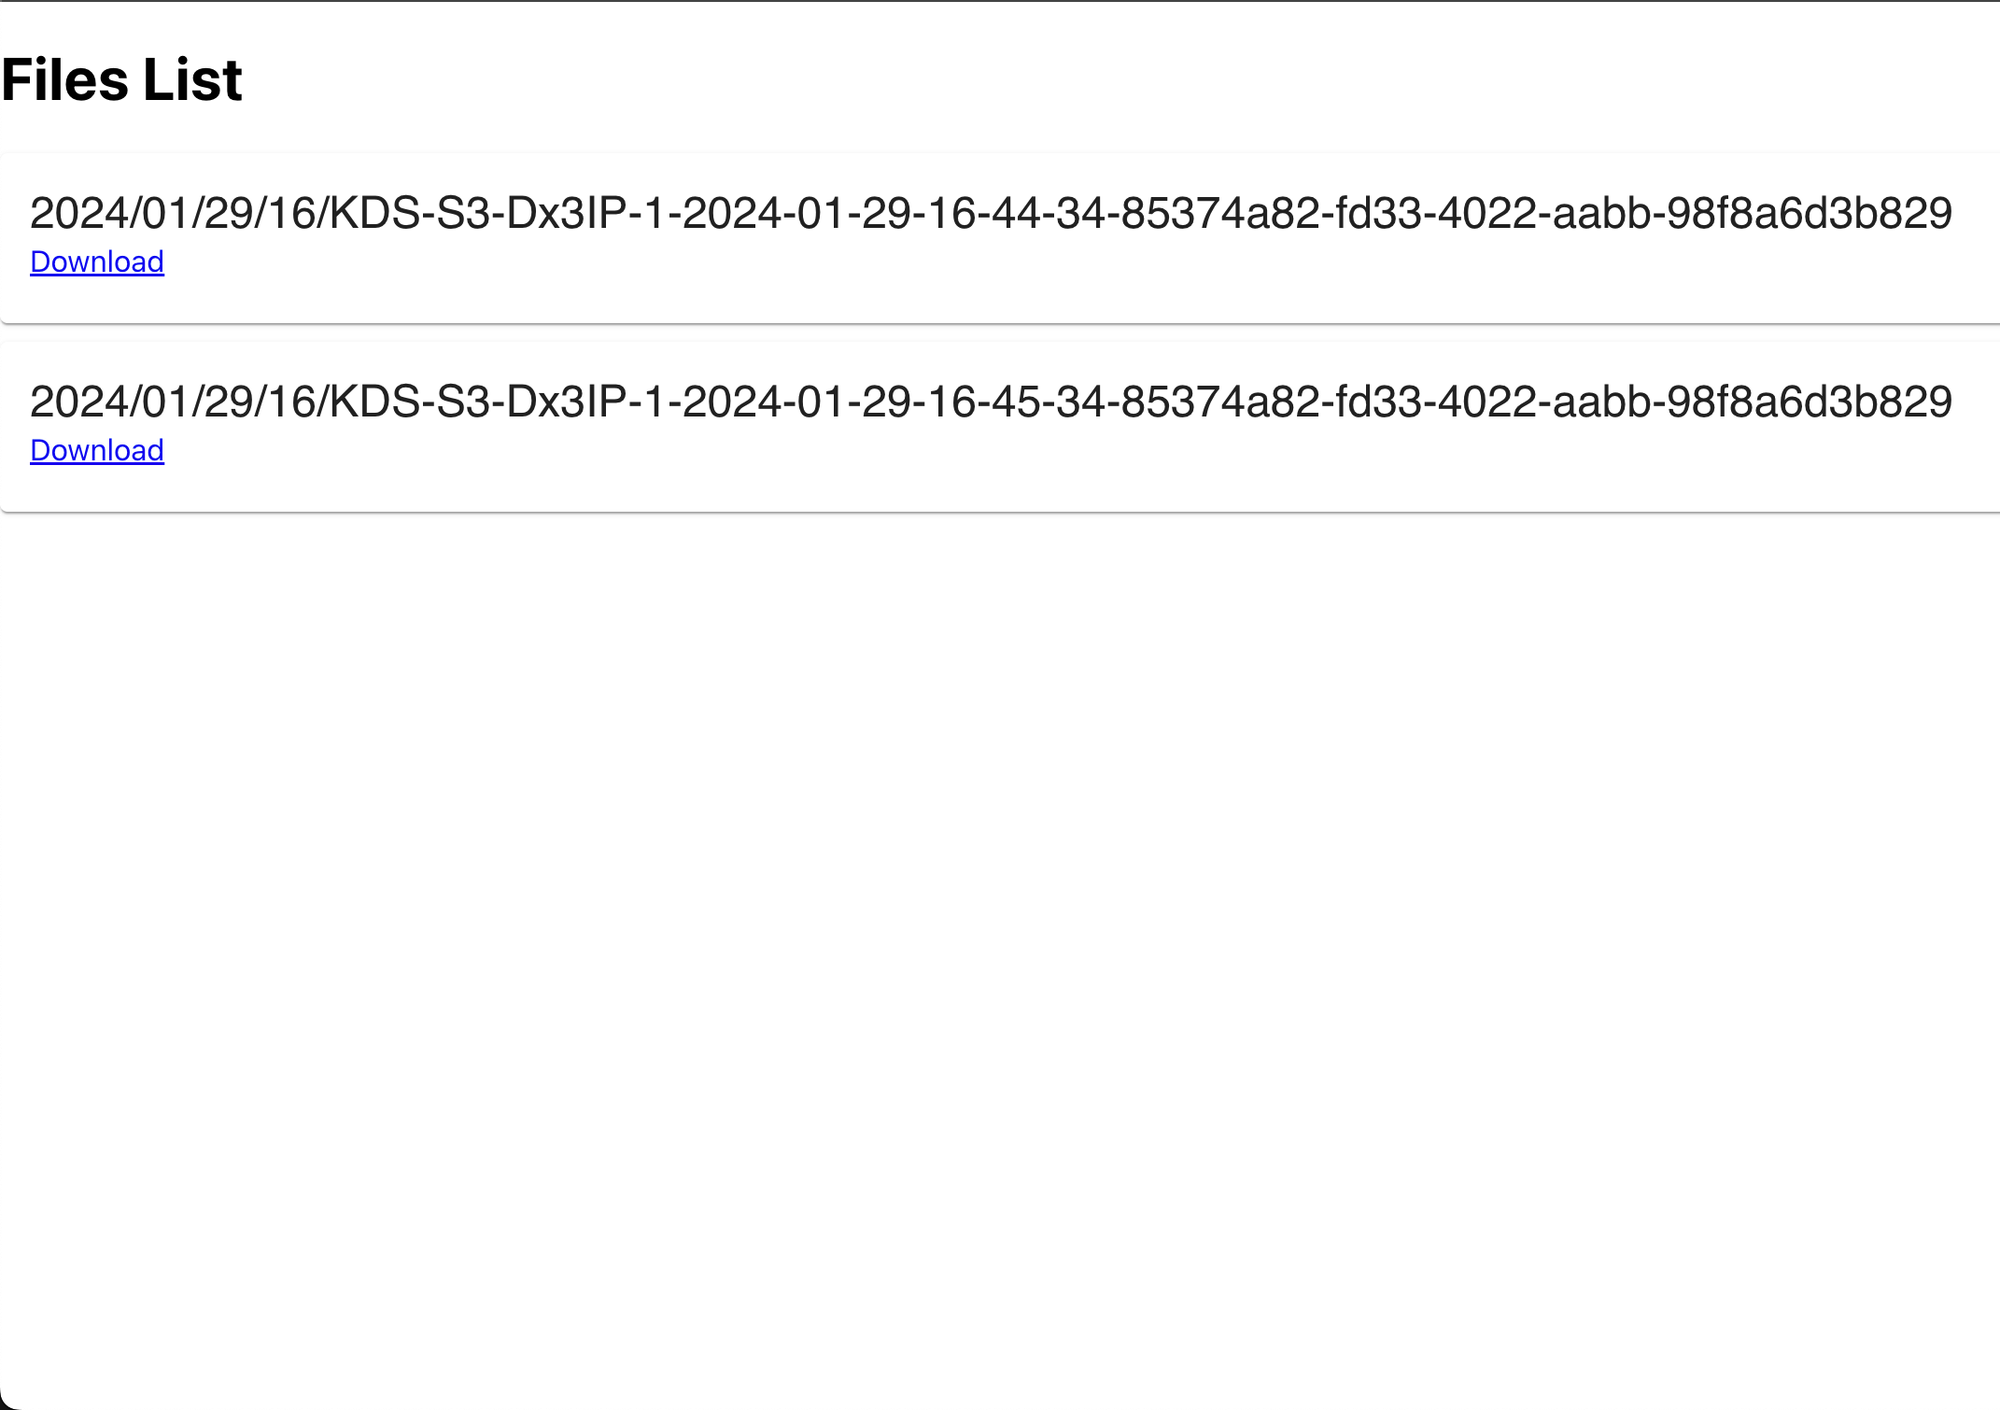
This application lists files coming from S3, which you can download by clicking the "Download" link. This is a basic example of how to list and download these files from your web application.
Congratulations! You've successfully implemented CDC using DynamoDB, Amazon S3, and Amazon Kinesis Data Streams.
Conclusion
In this article, you learned how to set up DynamoDB and Kinesis Data Streams, how to track data changes, and how to send these changes to an S3 bucket almost instantly. If you're interested, you can go further and implement more advanced features, such as analyzing the data from S3 and using this data to track the history of your inventory, or implementing machine learning models to learn from your inventory logs to be able to optimize stock management and reduce waste.
If you need to power analytics from your DynamoDB data, consider exploring Propel. For example, you to directly ingest your DynamoDB CDC to a Propel Webhook Data and expose it via low-latency analytics APIs to power dashboards and reports. You can also enrich and transform your DynamoDB data for analytics using Propel’s Materialized Views. Think of it as gathering your data in one main spot for different uses.
Alternatively, Propel also integrates with ELT platforms like Fivetran and Airbyte as well as data warehouses like BigQuery and Snowflake. This allows you to ingest data from either of these platforms and then use it to Propel to power customer-facing analytics.


